Sunday, 23 June 2013

                      The Compost Loo Construction Begins


Well yes I could have ordered one of those ready made affairs, some look just like a council loo and some like a cutesy shed, but mine is for a Forest Garden and I am chair of Coppicewood College so it had to fit a different genre.

So Jamie Miller was invited to design mine. Jamie is a Coppicewood "Old Boy"
and has gone on to be one of the most innovative round wood timber framers in this part of the world, his brief was to look at the environment around the chosen site and design something that would enhance the garden yet of course be practical and produce compost for use round the trees.

So the work commenced in early June when the weather was fabulous.

Jamie and his team, Ray(ex Coppicewood Student) and Blue (Jamie's Apprentice) had pre prepared the Larch poles by peeling the bark and making the mortise and tenants joints.


Next the but ends of the verticals were charred in the fire pit.

Ray made the pegs on his trusty shave horse and these were used to secure the uprights to the ridge poles and all the other joints. Then the frame was raised.


Next on went the roof and the interior framing
Now the cladding and floor boards, all made of Douglas Fir
Almost complete but I will have to wait until next Month for the final touches.
 
All the wood used on this construction has come from the local area.

Jamie and his team are off to Glastonbury to lead Timber Framing Workshops so I will have to wait until they get back for the completion. All in all it will take 4 days to finish and then I my family and my guests will be able to enjoy a peaceful poo in the Forest Garden. Oh joy!!

Meanwhile a couple of highlights in the Garden itself.
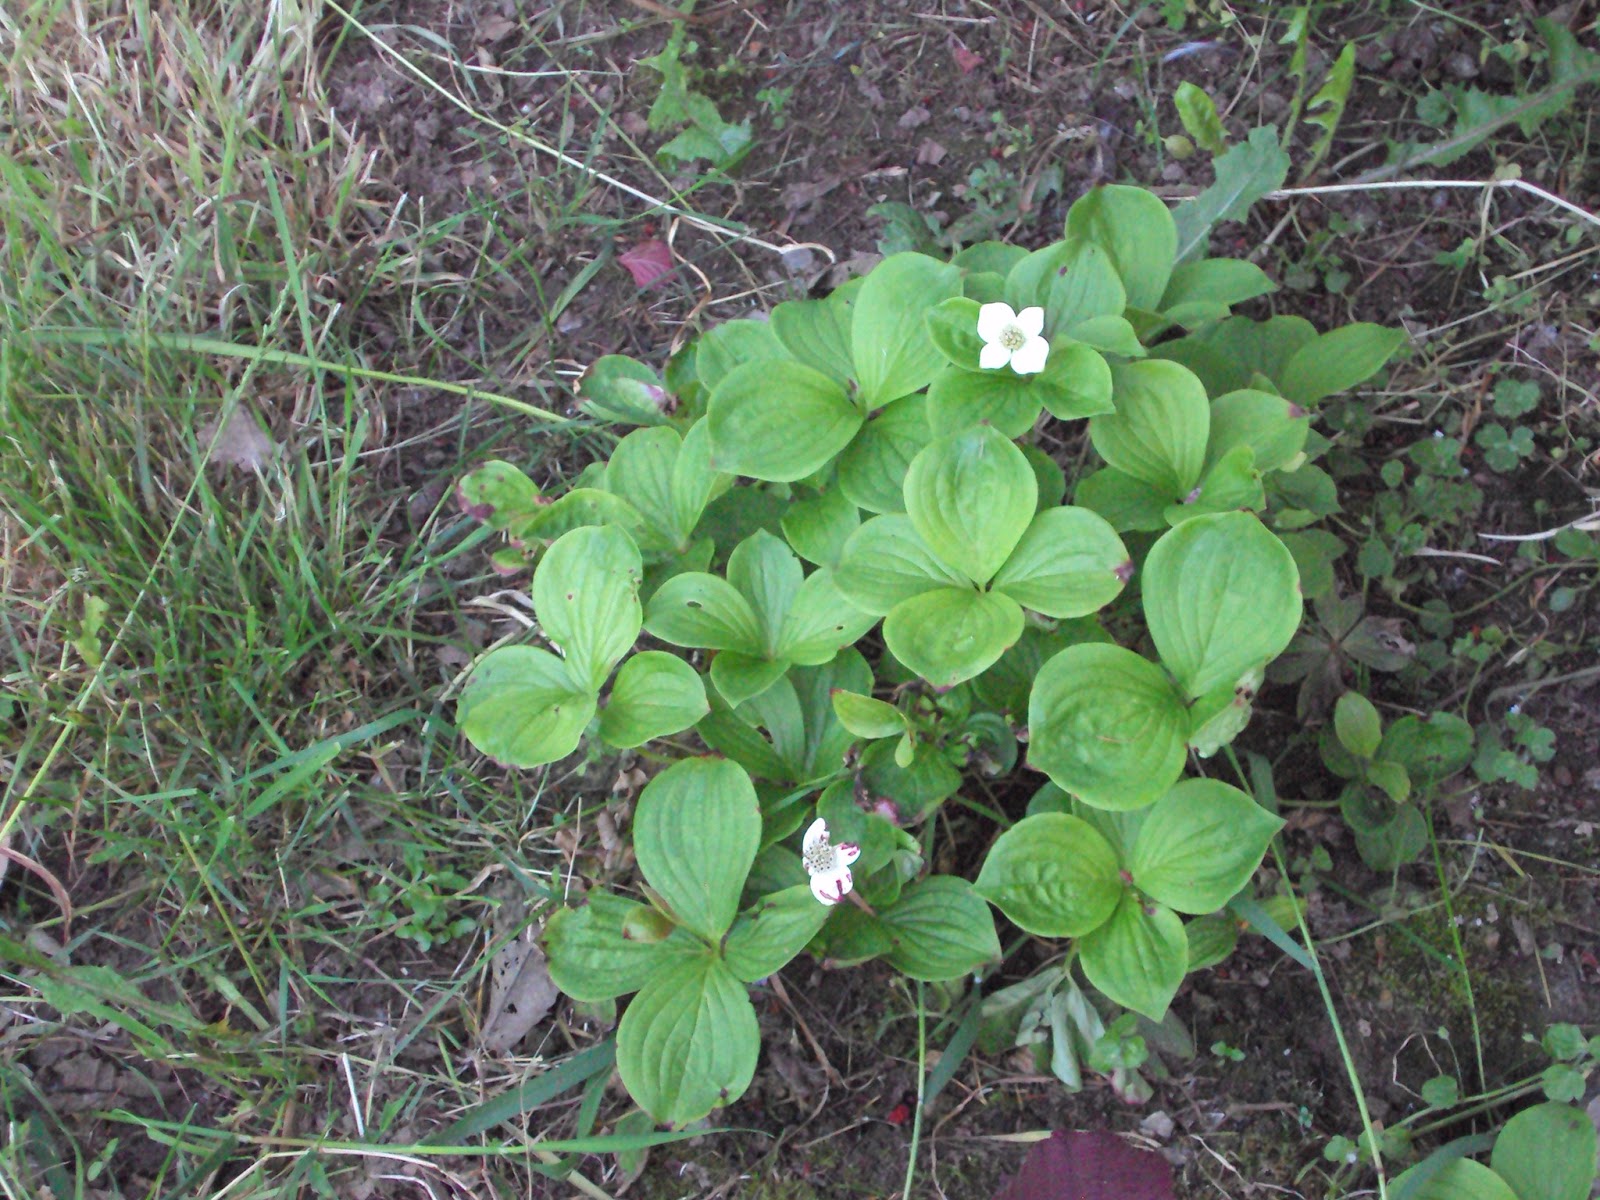
My first flower on the Cornus Canadensis (creeping dogwood) planted last winter.

Gooseberries shaping up nicely

Using the brash from winters coppicing over cardboard with green hay on top for mulching an apple tree
The finished job which from previous experience will last for 2 years


This beautiful foxglove just turned up in an dormant area of the FG, isn't nature fantastic.
 My next post will have pics of the completed loo and some comments about what plants have thrived and those that have not over the past 2 seasons. Till then!!


Saturday, 11 May 2013

Spring has Sprung at Last

Yes but what a long wait.

But I was able to get on with in-between.........

Got our log burning range delivered and up and running...... fantastic, but it will be a challenge keeping up with the demand for logs next winter so I spent a bit of time sawing and splitting too.


 Had some little visitors, made a box cart out of recycled bits courtesy of the "Small World Theatre"
in Cardigan and had just the place to try it out. What a great building and a super crew:
www.smallworld.org.uk


Had some big visitors;

Coppicewood Woodland Skills students came for their day in the FG as part of the course had a morning scything and a guided tour in the afternoon. These guys take sustainability seriously, they have just finished 6 months 2 days a week coppicing a 1 acre plot, out in all weathers, so a nice day with me was just reward.For more info go to: www.coppicewoodcollege.co.uk


Ran a Scything course for 2 keen prospective scythers. We covered all aspects including setting up a brand new scythe to hand peening using a hammer and anvil.
Anyone interested in learning to scythe with particular emphasis on land management or who would simply like a day in the FG learning a new skill do contact me at bslark@aol.com


Then the sun shone and it warmed up and look what happened.


Amelanchia
lamarki
in full flower


Crab
Golden Hornet
ready for the bees.


 Feeding time in the FG, my treasured wood ash   being applied prior to mulching. Besides this I  also apply leaf mould and watered down urine.

This is a great time to check the health of all trees and shrubs, as any problems can easily be spotted by looking at the emerging leaves, checking for colour and vigour. So far all mine are very happy except those plants that have been damaged by the cold damp conditions  we have suffered lately. These include Prunus tomentosa (Nanking cherry) and Arbutus unedo (Strawberry tree)
It rained at last!!!! the grass grew and  I got
scything to collect green hay for topping up cardboard mulch.

It is vital that the ground has a thorough soaking before any mulch is laid. We have just had plenty of rain so its back out to put down that mulch and check on my newly planted trees.

Till next time


Monday, 11 February 2013

Wood Fuel from the Forest Garden

As this is my first post in 2013 a belated Happy New Year to you.

January has been  the usual mix of cold damp snowy frosty weather that we have been accustomed to over the last few winters indeed this year it has run into February and as I write many areas of GB have been affected by more snow. As yet we are clear of it in the far West, which is helpful as I have 3 Japanese Plum trees bursting with flower right now, Jack frost stay away please!!!

One of the most important tasks for me this time of the year is to assess the hedgerow around my 4 acre plot for potential fuelwood pea and bean sticks and posts. Added to this my Lime and Italian Alder trees now need checking for either coppicing  or pollarding as they are now established for 10 years. I have 3 lime trees and decided to pollard the one that has made the most growth. The idea here is to instigate the generation of fresh leaves which are used in salads as a lettuce replacement.
The 10 year old Lime before pollarding


And after making sure that the young growth will be at pickable height. The material that I cut will be used for spoon making, firewood and pea sticks.

Next came the Italian Alder which had put on magnificent growth for just 10 years, here are the before and after pics.


I have taken a chance with this tree as I have been told that unlike its English cousins it will not coppice. I took a couple of low lying branches off it last year and was pleased to observe that it did indeed send out some new shoots. I suspect that though it may not coppice it may well react positively to pollarding, but I will have to wait for proof. You may note the pile of brash just behind the stump, this will be used as you may use bark chippings. I have cut it up as fine as I could and will eventually use it as a nitrogen rich mulch for the trees. The logs will either used split down as posts or for firewood (not the best but will burn quite well when fully dried/seasoned this takes at least 3 years)
 
 
Meanwhile the rest of the hedgerow has only suffered a small amount of controlled coppicing, there is plenty of more substantial work awaiting my bow saw and bill hook, however I may leave it until next winter due to the 300 year old Ash tree that came down last year that still needs a lot of hauling and clearing and making into firewood,all this at the time I am just about to have my oil fired boiler/cooking range converted over to wood fired by a great company in Derby, have a look at them here:http://www.marshallcookers.co.uk/woodfired.htm. All parts are made in the UK a small but really great UK Company.
 
It all goes to show that a hedgerow can be an important resource in a Forest Garden not just for food but also firewood. Here is how that Ash Tree is ending up.
 
 
This bee hive shape allows air to circulate the logs and accelerate the seasoning process, after a year of full exposure the logs can be stored under cover for a futher year. It has been said that Ash logs can be burnt green however for the most efficient burn they need to be completely seasoned so its worth excercising patience in order to get the most out of your hard work. By the way I only use hand tools to coppice and make logs, this method is truly sustainable and whats more keeps me in good shape and these tools are a pleasure to use. Bill hook,bow saw,splitting axe and for large logs a two handed cross cut saw, awesome. Go here to find out more www.coppicewoodcollege.co.uk
 
Lastly many thanks to those of you who have sent me messages of encouragement they are really appreciated. Visitors are always welcome especially if help is offered for the day.
To finish off this post here is a seasonal pic of the FG.


Saturday, 22 December 2012

IN THE COLD DAMP MIDWINTER !!!

Not only damp but murky as the light conditions have been lower even than last winter. This has had at least one beneficial effect as the Oca tubers seem to revel in low light conditions and have given me the best crop per plant yet with some of the largest tubers I have ever grown. The trick with oca is to keep them in the ground even if the tops are cut back by the frost. I still have a number of plants unharvested as underneath the tops tubers are still swelling.I shall keep back about 60 tubers for planting next year the rest will be eaten as per potatoes. Each year I keep more and more back so that I can build up numbers until I am self sufficient in this wonderful plant.

Here is a pink and white type with the tubers still swelling inside their protective cover of home grown(mown with my scythe) hay which I had used to "earth up" the haulm.Photo taken 3rd Nov.

My other tuberous plants have done well also especially the Yacon which really surprised me with the weight of crop per plant which averaged 2 Kg.Yacon root is sweet like a carrot but more juicy so that it is more like a fruit. It stores well and gets sweeter the longer it is kept. The tubers are just a storage facility for the plant the reproductive tubers are tiny by comparison and cluster at the base of the stem. I keep these in my poly tunnel covered with straw and just on the damp side. As soon as they start to sprout in the spring I detach them and pot them up prior to planting out when all danger of frost has passed.

Here's how the tubers form, I think they would have been bigger if we had better weather.

Chestnut processing.
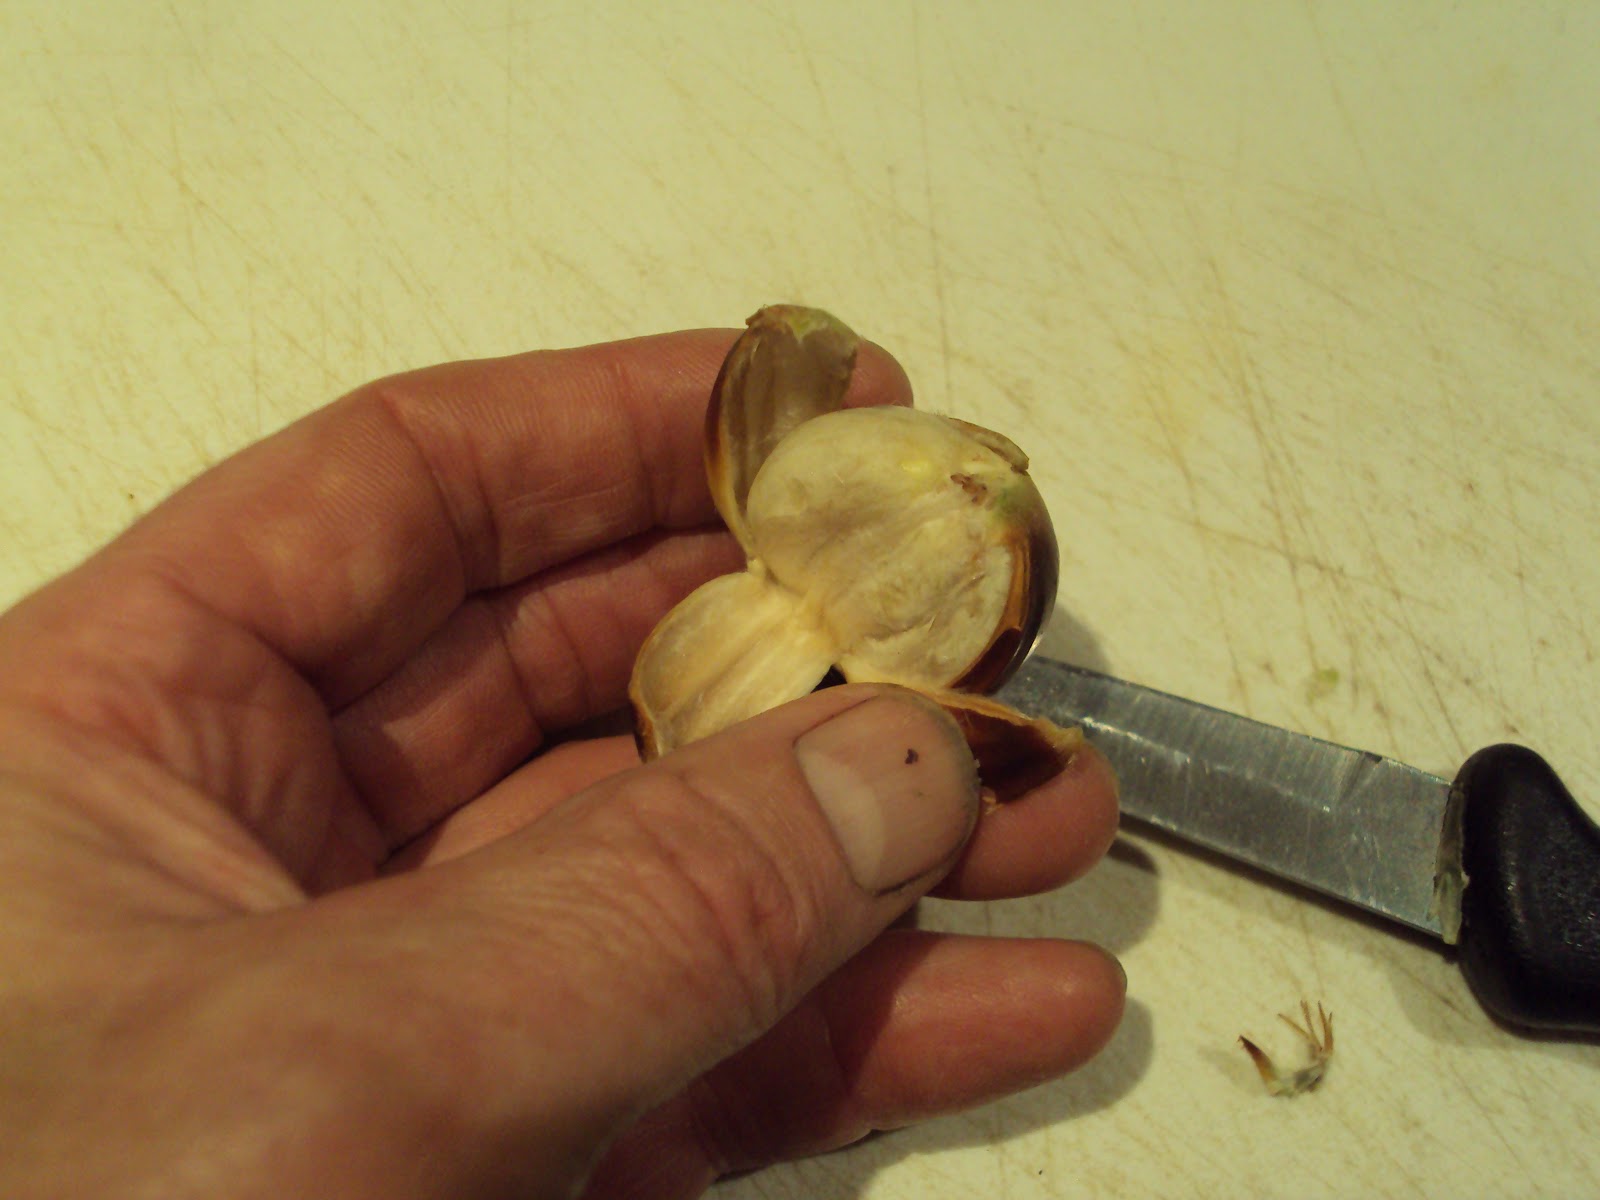
In my last post I showed a pic of the outer case split open revealing 3 good sized nuts inside.I have since cropped the tree and processed and prepared the Seasonal nut roast.The method I used is never explained in the recipes and I imagine that most people wold buy ready prepared nuts from the store. Most recipes tell you to part immerse the nuts in boiling water for about a minute, having first slit the outer skin to allow air to escape during the heating. Then you should be able to remove the outer skin and peel off the inner bitter skin. I tried this but found I the inner skins only peeled off whilst quite hot and  you could only process in small batches as well as scalding fingers so not much fun.Here is my method:

Process within a few days of picking the earlier the better.
First peel the outer skin using a knife to make a slit the rest comes away easily.

The bitter inner skin easily peels away leaving the heart ready for storing until required for cooking.I kept the peeled nuts in a plastic food bag in the fridge until I had enough for my festive roast. They kept really well like this for a couple of weeks, whilst I continued to collect nuts and process daily.There is no doubt that it is an benefit to have the tree just a few meters from the kitchen, but of course that's the idea of a forest garden.

If you would like the Chestnut roast recipe send me a message and I will email it to you.

Until next time when I will be looking at firewood and kindling, have a merry one !!

Thursday, 1 November 2012

Berries and Nuts bring a late harvest bonus in
The Forest Garden

Some of the plants growing in the FG are to say at least unusual as food plants, indeed who would think that the Berberis and Hawthorn would feature as an important Autumn crop.

Here is Berberis wilsonii and I must admit picking these is not for faint hearts as there are many sharp spines in amongst the berries.I have discovered that the spines all seem to point in one direction and the berries can be stripped by lining up two fingers carefully behind the rear bunch and pulling towards the tip.Using this system I managed to strip my plants without drawing blood. having collected the berries what next? Processing using a "Green Life" juicer got a remarkable volume of bright pink juice which tasted just like lemon juice and indeed can be used as a lemon substitute as its high in vitamins and has anti cancer properties.Oh yeas as with other berry plants, please leave some on for the birds.

Next up is Hawthorne C. schraderiana quite delicious raw but has the drawback of having 5 hard seeds to deal with, so its out with the moulee and after a bit of grinding you get a pulp which can be eaten just as it is or frozen/ dehydrated for later use. You can also cook the fruit and decant the juice for freezing or just drink straight away (its delicious). Or of course make jam/jelly. I estimate 5kg per tree but I left some berries on for the birds.
Yes I know, i did think that the chestnut crop had failed due to the vast number of dud nuts that fell in September. My brilliant tree saved the best for last as despite the poor summer it still produced about 3kg of plump nuts, more than enough to secure a festive nut roast.Brilliant!!!
This is a Trazel nut cluster (Trazel is a cross between the Turkish hazel and a European hazel) This is my best performing nut tree by a country mile producing 100's of nuts this year.They are the same size and taste as European hazels.
And now for some Autumnal tones.
This is Koulrateria paniculata or the Golden rain tree giving off a golden glow.
Here is Hawthorn C.ellwangeriana in bronze effect.


And to finish the leaves of a Black Chokeberry(V. Hugin), quite stunning.

Till next time.


Friday, 12 October 2012

Just a few bright days to celebrate so far this Autumn.

And I was able to celebrate these with a record number of visitors.

Interest in Forest (food) Gardening has definitely increased over the last few years and this year I have had a number of groups arranging visits with me.I suppose that its also due to the fact that the Garden is now 10years old so more to see and that word has got around Pembrokeshire and Ceredigion that it is an interesting visit.

If you or your group would like to visit send me a message and we can fix a date.

I suppose that with all that's happening in the world right now the only way to guarantee future supplies of fresh food and to afford it, is to to find more ways of growing it ourselves and it just so happens that the FG is a logical way to progress as once a tree or shrub is planted it will go on producing for many years without too much maintenance. Indeed if nitrogen fixers are included in the planting scheme a major nutrient requirement is automatically supplied.Compost,urine and wood ash are other easily obtained fertilisers which with a bit of organisation can insure that all the plants have all the nutrients they need continually without buying chemicals.

The FG is also a way to get a wide ranging nutrition without animals, those with a meat free diet can potentially become self sufficient by using a variety of tubers,nuts, fruit, berries, fungi, flowers and leaves. It is well known that massive numbers of ruminants grazing Fields is not only an inefficient method to feed humans and casts doubt on our ability to feed the increasing future population, but adds massively to the CO2 production( I believe the latest figure is 18% of total emissions worldwide)

So any increase in the number of Forest Gardening, Agroforestry or Permaculture projects will start to create a better balance and increase our ability to feed a greater number of people locally.

That's my rant out of the way!!!

Here are the team photos' of my recent visitors.
This is the Groundwork Wales team who were on a mission to visit sustainable permaculture projects in the Pembrokeshire area. They managed to see the Community Forest Garden in St. Dogmaels, my FG and then onto the Llamas project.that was a busy day.


May I introduce the Denmark Farm Team whose main interest was in plants that can attract birds and insects to their community gardens.I had plenty to show them as I do grow a number of plants for just that purpose.
Just a few pics of what I have just cropped.


One crop that did rather well this year was my Fuggles hops took me 4 hours to pick them all though.


This is a hawthorn C.ellwangeriana has large apple flavoured haws which are nice raw and can be cooked to make jellies juice and jams.They look great this time of year.


The maturing nuts of Corylus x Colurnoides or Trazel (freeoka).The best nut crop from any of my trees as yet.

A sad note to end this blog all my 3 trees have produced mini nuts not even worth the squirrels attentions lets hope for a better summer next year.Till next time.

Friday, 7 September 2012

Welcome to my Woofers

I met Andrej and Sophia at the Really Wild show at St Davids (The UK's smallest and most beautiful City). They stopped by at the Coppicewood College stand to watch a pole lathe demo.We got to talking and I discovered that this couple were on a learning trip throughout the UK taking in as many sustainable projects as they could eithin a 12 month time frame.So I invited them to the College's woods near Cilgerran and also to the Forest Garden.They turned up on the 7th August just as I had finished scything my mini hay meadow and promptly offered to help me make some hay. I got a bonus though as they had previously learned how to make a hay rack with the folks at the Dyfed Permaculture Trust and guess what I now have a hay rack courtesy of Andrej.
They carried on making bales using my hand cart as a former and then we spent a pleasant evening discussing forest gardening over a meal enjoyed outside cooked up by that most important member of my family my wife Kathy.They camped out in the garden and had a great day in the rain over at the College on Wednesday, leaving us to continue their UK cycle tour next stop Aberystwyth. Anyone waiting to follow their adventures can go here www.maslowskismovingalong.wordpress.com

Hot on the heels of this visit came another our Daughter Shirah and our 2 Grandsons Owen (9) and Archie(4). The boys wanted to help make some more bales so I thought I would use them to demonstrate how I went about it.So here goes:
Firstly I split the New Zealand flax leaves into workable strips starting them off with a knife.

  Next lay out the strips in the cart.That's Owen doing a great job.
Now start to pack in the dry hay keeping the strips in place.
Here comes Archie pounding the hay to compress it prior to tying it up trouble was Archie loved it so much this element took a little longer than planned.
See what I mean!!! Actually this is where we get each end to tie up I make a loop on one side and put the other end through the loop so that I can apply maximum pressure to compress the hay further.
Here's the end result, its true that the edges are a little fuzzy and it doesn't look like one of those professional machine made square bales but its all mine, hand made and it will make a great substitute for grow bags next spring. so its off to the shed to stack it with the others.
See the shadowy figure in amongst the rowan. that's Millie the Mistle Thrush. She delights in alternating between the Mulberry tree and this one picking off the berries as they ripen. Despite several attempts top scare her away from my precious Mulberries she just won't shift, even a beak to nose confrontation was won by her, Bless. Till next time.